Back up photos using Windows Import Tool, Windows Explorer, iTunes or cloud storage
Freeing up space on a cluttered iPhone can be extremely useful, and it makes sense to back up precious photos in case of data loss. In this guide we accomplish both aims by transferring photos from your iPhone to your PC using Windows Import Tool, Windows Explorer, iTunes or cloud storage
A full iPhone is not fun; neither is losing precious photos in a data loss disaster. For these reasons, it makes sense to create a backup of your photos. Unlike Mac computers, Windows computers sometimes interact oddly with Apple products, and transferring photos from an iPhone to a PC can be slightly more difficult than the equivalent Mac operation.
But don't worry, because in this tutorial we look at how to copy photos from your iPhone on to any Windows computer, including ones running Windows 10, covering Windows Import Tool, Windows Explorer, iTunes, cloud storage and some third-party software tools.
How to transfer photos from iPhone to PC: Unlock your phone and install the drivers
First of all, you'll want to switch on your iPhone or get it off the lockscreen, as if the phone is locked with a passcode or fingerprint, your PC will not be able to see the photos on your iPhone. Once you connect your iPhone via USB to your computer (using a 30-pin or Lightning cable), your PC should pick up the device.
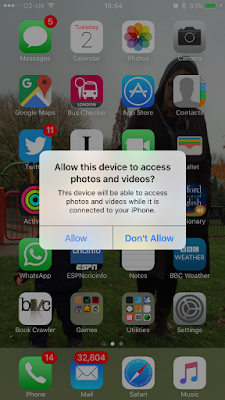
In order to give access to your PC to see the photos and videos taken on your iPhone you'll need to trust your PC via your iPhone. This is often presented by a pop-up on your iPhone which presents you with 'allow' and 'don't allow' options for your PC.

After picking Allow, you'll see Windows automatically installing the drivers for your iPhone; once complete, it will present you with a pop-up that allows you to import the pictures and videos using Windows or Windows Live Photo Gallery, and finally using Windows Explorer. If you're not presented with a pop-up auto-play window, go to My Computer or My PC to find your iPhone.
How to transfer photos from iPhone to PC: Windows Explorer
If you wish to quickly view your photos and extract them to your PC, you should select the option with Windows Explorer, as this will allow you to view all the photos on your device and extract individual images and videos (including screenshots) from your iPhone.

After selecting the Windows Explorer option, select Internal Storage, DCIM, and then within the DCIM folder you'll find the picture folder (which might be split into separate folders). Within the picture folder you'll be able to cycle through the iPhone's photos and videos (including screenshots). From here simply copy/cut and paste the photos to your desired location on your computer.

How to transfer photos from iPhone to PC: Windows Import Tool
There is also an alternative way which allows you to import all pictures and videos to your computer through Windows' import tool. This method will not allow you to choose which photos you want synchronised, but will allow you to sort the imports by various folder names and name the individual files by Tag or Original Name.
This method is useful if you wish to unload every photo from your iPhone to your computer, but we felt the Windows Explorer option presented us with more flexibility.

How to transfer photos from iPhone to PC: iTunes
There are other methods of transferring photos from your iPhone to your computer, one of which uses iTunes to back up and save photos to your computer.
Most of us have iTunes installed, which makes this an obvious method to use, but iTunes' limitations (and the difficulty some older PCs have running the program) mean it only really makes sense if you use iTunes regularly for other purposes.
How to transfer photos from iPhone to PC: Cloud storage
The cloud is a fantastic way of backing up photos: you don't have to worry about any cables, as the whole process is done through the internet. This does cause a potential problem, though, as you'll need to be connected to the internet (hopefully via a Wi-Fi connection) and be constantly uploading photos to the cloud. If you're not on Wi-Fi, this will burn through a lot of data, and could end up being a costly solution.
No matter which company you choose to back up your photos to the cloud - Dropbox, iCloud, Google Photos - they all have limited amount of storage space unless you choose to upgrade to various different cloud-storage plans.

0 Response to "How to transfer photos from iPhone to PC"
Post a Comment